Product

Showing posts with label Practical Mahine Learning. Show all posts

Saturday, 21 March 2026

Feature Scaling in Practice: What Works and What Doesn’t


Feature Scaling in Practice: What Works and What Doesn’t

Feature Scaling in Practice: What Works and What Doesn’t
Image by Editor | ChatGPT

Introduction

In machine learning, the difference between a high-performing model and one that struggles often comes down to small details. One of the most overlooked steps in this process is feature scaling. While it may seem minor, how you scale data can affect model accuracy, training speed, and stability. However, not all scaling methods are equally effective in every scenario. Some techniques improve performance and ensure balance across features, while others may unintentionally distort the underlying relationships in the data.

This article explores what works in practice when it comes to feature scaling and what does not.

What is Feature Scaling?

Feature scaling is a data preprocessing technique used in machine learning to normalize or standardize the range of independent variables (features).

Since features in a dataset may have very different units and scales (e.g., age in years vs. income in dollars), models that rely on distance or gradient calculations can be biased toward features with larger numeric ranges. Feature scaling ensures that all features contribute proportionally to the model.

Why Feature Scaling Matters

  • Improves model performance: Algorithms like gradient descent converge faster when features are normalized, since they don’t have to “zig-zag” across uneven scales
  • Interpretability: Standardized features (mean 0, variance 1) make it easier to compare the relative importance of coefficients in linear models
  • Better Accuracy: Distance-based models such as k-nearest neighbors (KNN), k-means, and support vector machines (SVMs) perform more reliably with scaled features
  • Faster Convergence: Neural networks and gradient descent optimizers reach optimal solutions more quickly when features are scaled

Common Feature Scaling Techniques

1. Normalization

Normalization is one of the simplest and most widely used feature scaling techniques. It rescales feature values to a fixed range, typically [0, 1], though it can be adjusted to any custom range [a, b].

Formula:
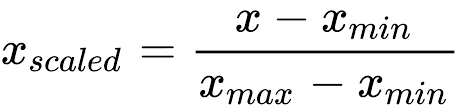
Normalization

2. Standardization

Standardization is a widely used scaling technique that transforms features so that they have a mean of 0 and a standard deviation of 1. Unlike min-max scaling, it does not bound values within a fixed range; instead, it centers features and scales them to unit variance.

Formula:
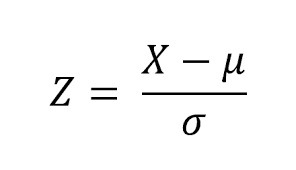
Standardization

3. Robust Scaling

Robust Scaling is a feature scaling technique that uses the median and the interquartile range (IQR) instead of the mean and standard deviation. This makes it robust to outliers, as extreme values have less influence on the scaling process compared to min-max scaling or standardization.

Formula:
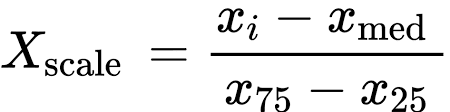
Robust_Scaling

4. Max-Abs Scaling

Max-Abs scaling rescales each feature individually so that its maximum absolute value becomes 1.0, while preserving the sign of the data. This means all values are mapped into the range [-1, 1].

Formula:

Max-Abs Scaling

Limitations of Feature Scaling

  • Not always necessary: Tree-based models are largely insensitive to feature scaling, so applying normalization or standardization in these cases adds computation without improving results
  • Loss of interpretability: Scaling can make raw feature values harder to interpret, which can complicate communication with non-technical stakeholders
  • Method-Dependent: Different scaling techniques can yield different results depending on the algorithm and dataset, and an ill-suited choice can degrade performance

Conclusion

Feature scaling is a critical preprocessing step that can improve the performance of machine learning models, but its effectiveness depends on the algorithm and the data. Models that rely on distances or gradient descent often require scaling, while tree-based methods usually do not benefit from it. Always fit your scaler on the training data only (or within each fold for cross-validation and time series) and apply it to validation and test sets to avoid data leakage. When applied carefully and tested across different approaches, feature scaling can lead to faster convergence, greater stability, and more reliable results.

Monday, 16 March 2026

Building Your First Chatbot: A Hands-On Tutorial with Open-Source Tools


Building Your First Chatbot: A Hands-On Tutorial with Open-Source Tools

Building Your First Chatbot: A Hands-On Tutorial with Open-Source Tools
Image by Editor | Ideogram

A chatbot is a computer program that can talk to people. It can answer questions and help users anytime. You don’t need to know a lot about coding to make one. There are free tools that make it simple and fun.

In this article, we will use a tool called ChatterBot. You will learn how to set it up and train it to respond.

Working of a Chatbot

Chatbots work by using algorithms to understand what users say. They listen to user input and find the best response. When a user types a question, the chatbot processes it. It looks for keywords and phrases to understand the meaning. Then, it selects an answer based on its training data.

The more the chatbot interacts, the better it becomes. It learns from each conversation. This allows it to improve responses over time. Some chatbots use natural language processing (NLP) to understand language better. This makes conversations feel more natural.

ChatterBot

ChatterBot is a Python library for making chatbots. It helps you create smart bots that can talk. The library uses machine learning to generate responses. This means the bot can learn from conversations. It is easy to use, even for beginners. ChatterBot provides different storage options. You can use SQL or MongoDB to save data. This lets you pick what works best for you. The library is also customizable. You can change how the bot responds to fit your needs.

ChatterBot is open-source. This means it is free to use and modify. Anyone can use it to build chatbots. It includes built-in datasets for training. You can use English conversation data to help your bot learn. This makes it a great tool for creating engaging chatbots.

Setting Up Your Environment

Before you start, you need to set up your environment. Follow these steps:

  • Install Python: Download and install Python from the official website. Make sure to get Python 3.5 or later.
  • Create a Virtual Environment: This helps you manage your project. Run these commands in your terminal:

Installing ChatterBot

Next, you need to install ChatterBot. To create a chatbot, it is also necessary to install the ChatterBot Corpus.

Let’s import the Chatbot class of the chatterbot module.

Initializing the ChatterBot

Once you have the ChatterBot library installed, you can start creating your chatbot.

Storage is important for a chatbot. It helps the bot remember what it learns. With storage, the bot can keep track of conversations. It can recall past interactions. This improves the bot’s responses over time. You can choose different types of storage. Options include SQL and MongoDB. SQL storage saves data in a database. This makes it easier to manage and retrieve later.

Setting Up the Trainer

ChatterBot can be trained with various datasets. The ChatterBotCorpusTrainer allows you to train your chatbot with the built-in conversational datasets.

To train your chatbot using the English corpus, you can use the following code:

Customizing Your Chatbot

You can customize your chatbot in several ways:

Change Response Logic

ChatterBot uses logic adapters to choose responses. You can change this behavior. Use the BestMatch adapter:

Add More Training Data

More training data improves your bot. You can create your own data file. Save it as custom_corpus.yml with pairs of questions and answers.

Train your bot with this custom data:

Implement Custom Logic

You can add custom logic for specific responses. Here’s an example of a simple custom adapter:

Testing Your Chatbot

Once your chatbot is trained, you can start interacting with it to test its responses. The following code creates a simple loop for chatting with your bot:

Deploying Your Chatbot for Interaction

If you want to make your chatbot accessible online, consider integrating it with a web application. Here’s a simple way to integrate your ChatterBot with a Flask web application:

This setup makes it easy to deploy your chatbot. Users can chat with it online. You can send messages to the chatbot through a web application.

Conclusion

With tools like ChatterBot, you can make your own chatbot quickly. As you learn more about how to use ChatterBot, you can add some of its additional features. You can make your chatbot understand language better, and you can have it connect it with other apps to do more things. This will make your chatbot smarter and more helpful.

Connect broadband

Why do governments, corporations, and experts promote eggs, meat, and other animal foods?

  Your question combines nutrition, public policy, ethics, religion, psychology, and AI. It's useful to separate evidence-based facts ...