From the prompt to the picture, Stable Diffusion is a pipeline with many components and parameters. All these components working together creates the output. If a component behave differently, the output will change. Therefore, a bad setting can easily ruin your picture. In this post, you will see:
- How the different components of the Stable Diffusion pipeline affects your output
- How to find the best configuration to help you generate a high quality picture
Let’s get started.
How to Use Stable Diffusion Effectively.
Photo by Kam Idris. Some rights reserved.
Overview
This post is in three parts; they are:
- Importance of a Model
- Selecting a Sampler and Scheduler
- Size and the CFG Scale
Importance of a Model
If there is one component in the pipeline that has the most impact, it must be the model. In the Web UI, it is called the “checkpoint”, named after how we saved the model when we trained a deep learning model.
The Web UI supports multiple Stable Diffusion model architectures. The most common architecture nowadays is the version 1.5 (SD 1.5). Indeed, all version 1.x share a similar architecture (each model has 860M parameters) but are trained or fine-tuned under different strategies.
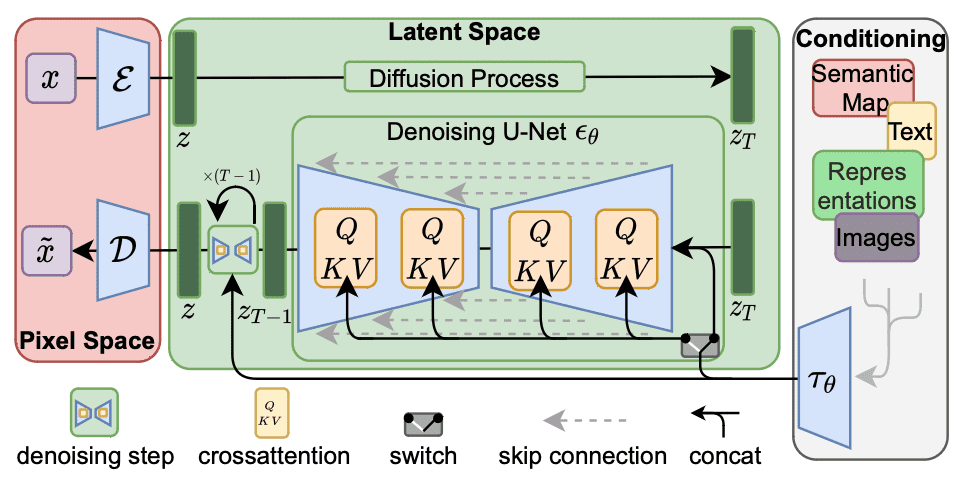
Architecture of Stable Diffusion 1.x. Figure from Rombach et al (2022)
There is also Stable Diffusion 2.0 (SD 2.0), and its updated version 2.1. This is not a “revision” from version 1.5, but a model trained from scratch. It uses a different text encoder (OpenCLIP instead of CLIP); therefore, they would understand keywords differently. One noticeable difference is that OpenCLIP knows fewer names of celebrities and artists. Hence, the prompt from Stable Diffusion 1.5 may be obsolete in 2.1. Because the encoder is different, SD2.x and SD1.x are incompatible, while they share a similar architecture.
Next comes the Stable Diffusion XL (SDXL). While version 1.5 has a native resolution of 512×512 and version 2.0 increased it to 768×768, SDXL is at 1024×1024. You are not suggested to use a vastly different size than their native resolution. SDXL is a different architecture, with a much larger 6.6B parameters pipeline. Most notably, the models have two parts: the Base model and the Refiner model. They come in pairs, but you can swap out one of them for a compatible counterpart, or skip the refiner if you wish. The text encoder used combines CLIP and OpenCLIP. Hence, it should understand your prompt better than any older architecture. Running SDXL is slower and requires much more memory, but usually in better quality.
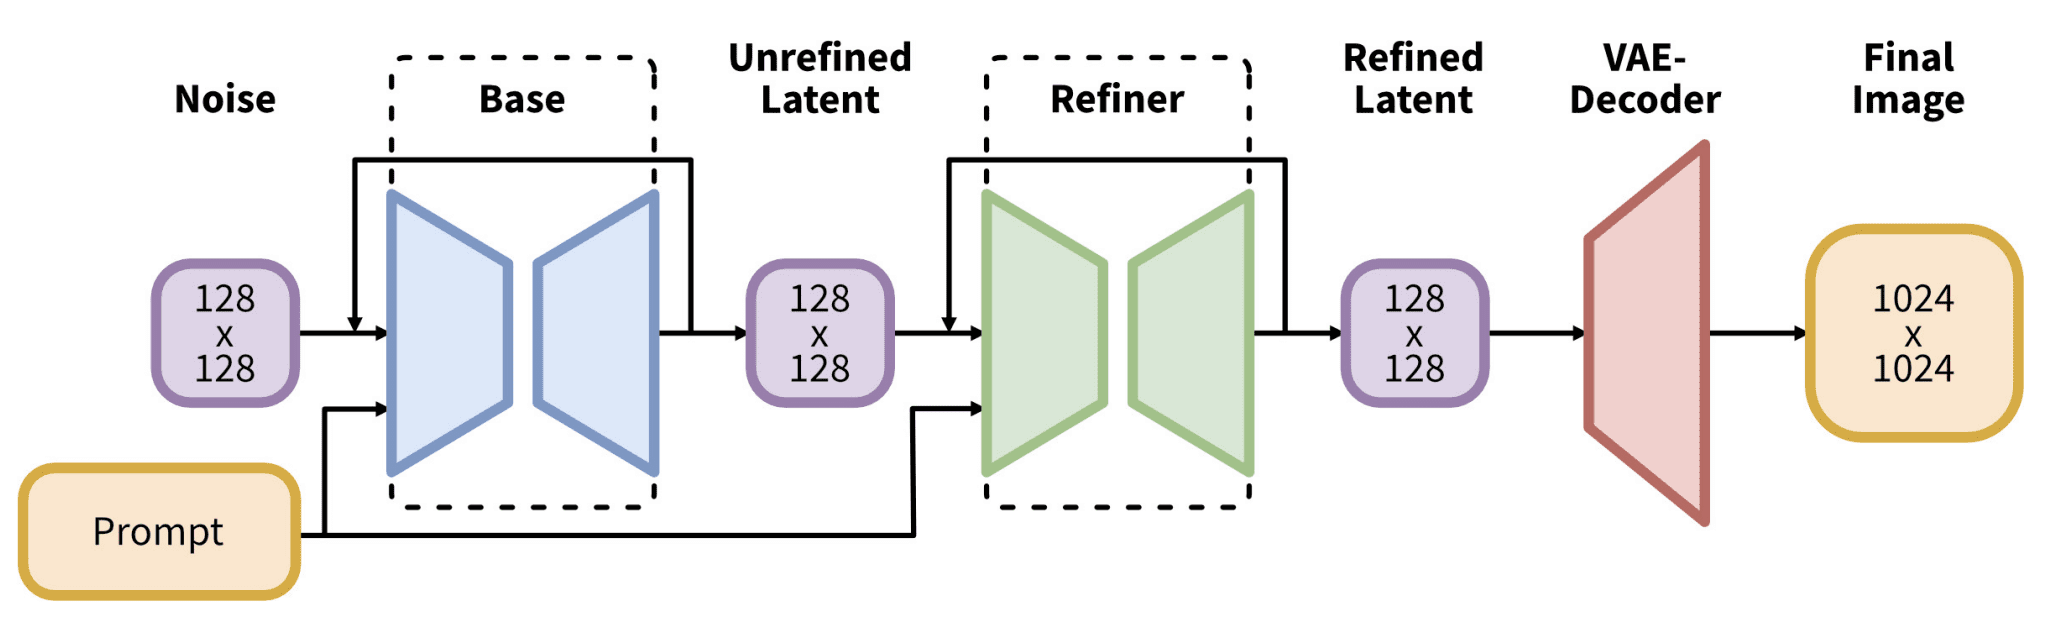
Architecture of SDXL. Figure from Podell et al (2023)
What matters to you is that you should classify your models into three incompatible families: SD1.5, SD2.x, and SDXL. They behave differently with your prompt. You will also find that SD1.5 and SD2.x would need a negative prompt for a good picture, but it is less important in SDXL. If you’re using SD2.x models, you will also notice that you can select your refiner in the Web UI.

Images generated with the prompt, ‘A fast food restaurant in a desert with name “Sandy Burger”’, using SD 1.5 with different random seed. Note that none of them spelled the name correctly.

Images generated with the prompt, ‘A fast food restaurant in a desert with name “Sandy Burger”’, using SD 2.0 with different random seed. Note that not all of them spelled the name correctly.
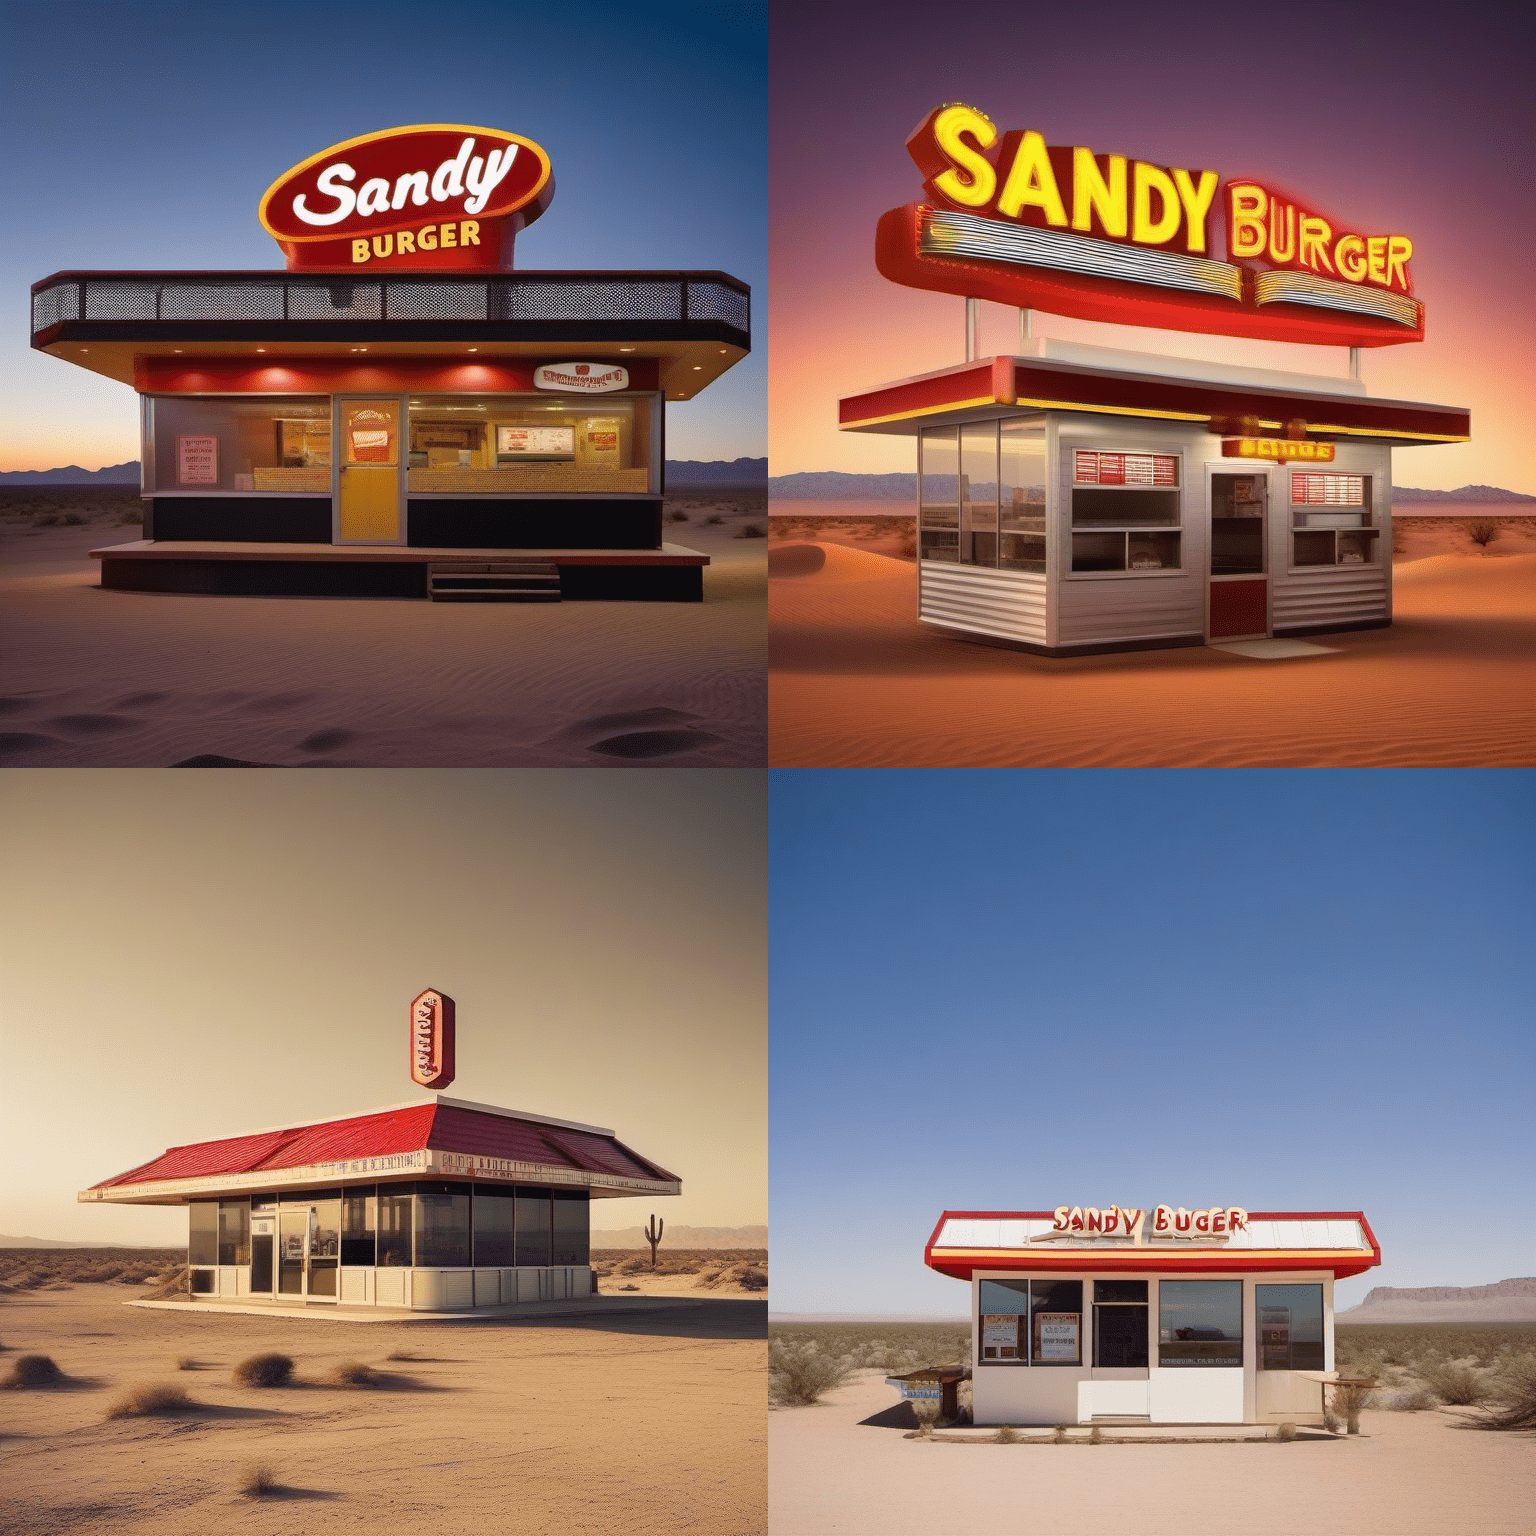
Images generated with the prompt, ‘A fast food restaurant in a desert with name “Sandy Burger”’, using SDXL with different random seed. Note that all of them spelled the name correctly.
One characteristic of Stable Diffusion is that the original models are less capable but adaptable. Therefore, a lot of third-party fine-tuned models are produced. Most significant are the models specializing in certain styles, such as Japanese anime, western cartoons, Pixar-style 2.5D graphics, or photorealistic pictures.
You can find models on Civitai.com or Hugging Face Hub. Search with keywords such as “photorealistic” or “2D” and sorting by rating would usually help.
Selecting a Sampler and Scheduler
Image diffusion is to start with noise and replaces the noise strategically with pixels until the final picture is produced. It is later found that this process can be represented as a stochastic differential equation. Solving the equation numerically is possible, and there are different algorithms of varying accuracy.
The most commonly used sampler is Euler. It is traditional but still useful. Then, there is a family of DPM samplers. Some new samplers, such as UniPC and LCM, have been introduced recently. Each sampler is an algorithm. It is to run for multiple steps, and different parameters are used in each step. The parameters are set using a scheduler, such as Karras or exponential. Some samplers have an alternative “ancestral” mode, which adds randomness to each step. This is useful if you want more creative output. Those samplers usually bear a suffix “a” in their name, such as “Euler a” instead of “Euler”. The non-ancestral samplers converge, i.e., they will cease changing the output after certain steps. Ancestral samplers would give a different output if you increase the step size.

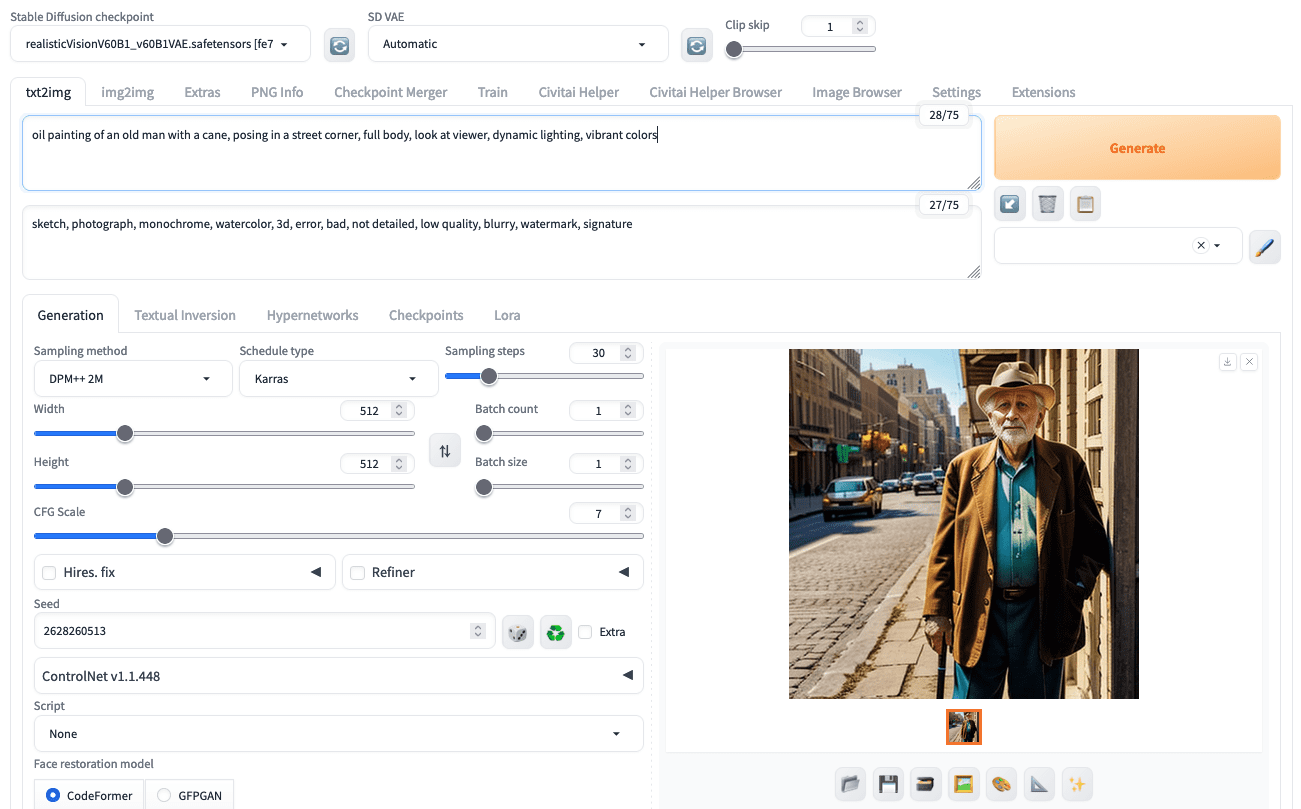
Selecting sampler, scheduler, steps, and other parameters in the Stable Diffusion Web UI
As a user, you can assume Karras is the scheduler for all cases. However, the scheduler and step size would need some experimentation. Either Euler or DPM++2M should be selected because they balance quality and speed best. You can start with a step size of around 20 to 30; the more steps you choose, the better the output quality in terms of details and accuracy, but proportionally slower.
Size and CFG Scale
Recall that the image diffusion process starts from a noisy picture, gradually placing pixels conditioned by the prompt. How much the conditioning can impact the diffusion process is controlled by the parameter CFG scale (classifier-free guidance scale).
Unfortunately, the optimal value of CFG scale depends on the model. Some models work best with a CFG scale of 1 to 2, while others are optimized for 7 to 9. The default value is 7.5 in the Web UI. But as a general rule, the higher the CFG scale, the stronger the output image conforms to your prompt.
If your CFG scale is too low, the output image may not be what you expected. However, there is another reason you do not get what you expected: The output size. For example, if you prompt for a picture of a man standing, you may get a headshot of a half-body shot instead unless you set the image size to a height significantly greater than the width. The diffusion process sets the picture composition in the early steps. It is easier to devise a standing man on a taller canvas.
Generating a half-body shot if provided a square canvas.

Generating a full body shot with the same prompt, same seed, and only the canvas size is changed.
Similarly, if you give too much detail to something that occupies a small part of the image, those details would be ignored because there are not enough pixels to render those details. That is why SDXL, for example, is generally better than SD 1.5 since you usually use a larger pixel size.
As a final remark, generating pictures using image diffusion models involves randomness. Always start with a batch of several pictures to make sure the bad output is not merely due to the random seed.
Further Readings
This section provides more resources on the topic if you want to go deeper.
- High-Resolution Image Synthesis with Latent Diffusion Models, by Rombach et al (2022)
- SDXL: Improving Latent Diffusion Models for High-Resolution Image Synthesis, by Podell et al (2023)
- Stable Diffusion page on Wikipedia
Summary
In this post, you learned about some subtle details that affects the image generation in Stable Diffusion. Specifically, you learned:
- The difference between different versions of Stable Diffusion
- How the scheduler and sampler affects the image diffusion process
- How the canvas size may affect the output