Gentle introduction to the Stacked LSTM
with example code in Python.
The original LSTM model is comprised of a single hidden LSTM layer followed by a standard feedforward output layer.
The Stacked LSTM is an extension to this model that has multiple hidden LSTM layers where each layer contains multiple memory cells.
In this post, you will discover the Stacked LSTM model architecture.
After completing this tutorial, you will know:
- The benefit of deep neural network architectures.
- The Stacked LSTM recurrent neural network architecture.
- How to implement stacked LSTMs in Python with Keras.
Overview
This post is divided into 3 parts, they are:
- Why Increase Depth?
- Stacked LSTM Architecture
- Implement Stacked LSTMs in Keras
Why Increase Depth?
Stacking LSTM hidden layers makes the model deeper, more accurately earning the description as a deep learning technique.
It is the depth of neural networks that is generally attributed to the success of the approach on a wide range of challenging prediction problems.
[the success of deep neural networks] is commonly attributed to the hierarchy that is introduced due to the several layers. Each layer processes some part of the task we wish to solve, and passes it on to the next. In this sense, the DNN can be seen as a processing pipeline, in which each layer solves a part of the task before passing it on to the next, until finally the last layer provides the output.
— Training and Analyzing Deep Recurrent Neural Networks, 2013
Additional hidden layers can be added to a Multilayer Perceptron neural network to make it deeper. The additional hidden layers are understood to recombine the learned representation from prior layers and create new representations at high levels of abstraction. For example, from lines to shapes to objects.
A sufficiently large single hidden layer Multilayer Perceptron can be used to approximate most functions. Increasing the depth of the network provides an alternate solution that requires fewer neurons and trains faster. Ultimately, adding depth it is a type of representational optimization.
Deep learning is built around a hypothesis that a deep, hierarchical model can be exponentially more efficient at representing some functions than a shallow one.
— How to Construct Deep Recurrent Neural Networks, 2013.
Stacked LSTM Architecture
The same benefits can be harnessed with LSTMs.
Given that LSTMs operate on sequence data, it means that the addition of layers adds levels of abstraction of input observations over time. In effect, chunking observations over time or representing the problem at different time scales.
… building a deep RNN by stacking multiple recurrent hidden states on top of each other. This approach potentially allows the hidden state at each level to operate at different timescale
— How to Construct Deep Recurrent Neural Networks, 2013
Stacked LSTMs or Deep LSTMs were introduced by Graves, et al. in their application of LSTMs to speech recognition, beating a benchmark on a challenging standard problem.
RNNs are inherently deep in time, since their hidden state is a function of all previous hidden states. The question that inspired this paper was whether RNNs could also benefit from depth in space; that is from stacking multiple recurrent hidden layers on top of each other, just as feedforward layers are stacked in conventional deep networks.
— Speech Recognition With Deep Recurrent Neural Networks, 2013
In the same work, they found that the depth of the network was more important than the number of memory cells in a given layer to model skill.
Stacked LSTMs are now a stable technique for challenging sequence prediction problems. A Stacked LSTM architecture can be defined as an LSTM model comprised of multiple LSTM layers. An LSTM layer above provides a sequence output rather than a single value output to the LSTM layer below. Specifically, one output per input time step, rather than one output time step for all input time steps.
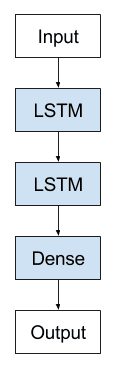
Stacked Long Short-Term Memory Archiecture
Implement Stacked LSTMs in Keras
We can easily create Stacked LSTM models in Keras Python deep learning library
Each LSTMs memory cell requires a 3D input. When an LSTM processes one input sequence of time steps, each memory cell will output a single value for the whole sequence as a 2D array.
We can demonstrate this below with a model that has a single hidden LSTM layer that is also the output layer.
The input sequence has 3 values. Running the example outputs a single value for the input sequence as a 2D array.
To stack LSTM layers, we need to change the configuration of the prior LSTM layer to output a 3D array as input for the subsequent layer.
We can do this by setting the return_sequences argument on the layer to True (defaults to False). This will return one output for each input time step and provide a 3D array.
Below is the same example as above with return_sequences=True.Running the example outputs a single value for each time step in the input sequence.
Below is an example of defining a two hidden layer Stacked LSTM:
We can continue to add hidden LSTM layers as long as the prior LSTM layer provides a 3D output as input for the subsequent layer; for example, below is a Stacked LSTM with 4 hidden layers.
Further Reading
This section provides more resources on the topic if you are looking go deeper.
- How to Construct Deep Recurrent Neural Networks, 2013.
- Training and Analyzing Deep Recurrent Neural Networks, 2013.
- Speech Recognition With Deep Recurrent Neural Networks, 2013.
- Generating Sequences With Recurrent Neural Networks, 2014.
Summary
In this post, you discovered the Stacked Long Short-Term Memory network architecture.
Specifically, you learned:
- The benefit of deep neural network architectures.
- The Stacked LSTM recurrent neural network architecture.
- How to implement stacked LSTMs in Python with Keras.
Do you have any questions?
Ask your questions in the comments below and I will do my best to answer.






No comments:
Post a Comment